快速使用
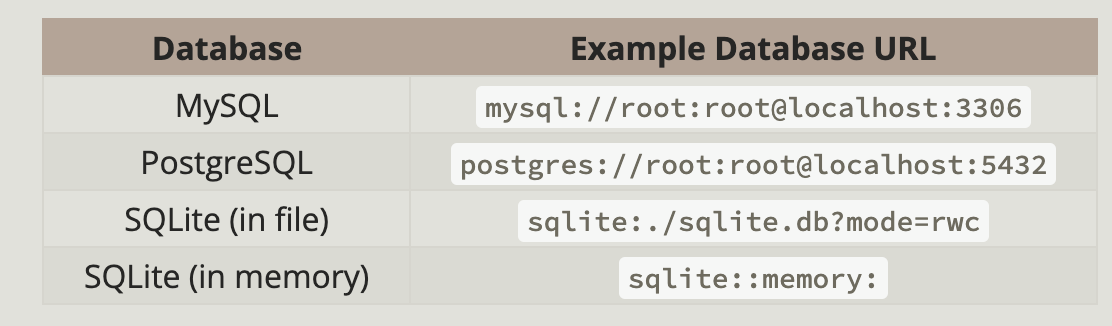
sea-orm支持下面几种数据库,以及数据库url的格式如下
概念
介绍sea-orm中的几个概念,方便理解
- entity:即操作的数据库对象
- Model:entity在代码中对应的操作对象,用作接收entity数据,进行读
- ActiveModel:也是代码中操作entity的对象,用来修改entity数据,进行更新
添加依赖
添加sea-orm依赖,还需要通过开启feature来引入要使用的数据库的驱动
sea-orm = { version = "0.12.15", features = [
    "sqlx-mysql",
    "runtime-async-std-native-tls",
    "macros",
] }
这里使用的mysql数据库,还支持以下数据库
sqlx-mysql- SQLx MySQL and MariaDBsqlx-postgres- SQLx PostgreSQLsqlx-sqlite- SQLx SQLite 除了驱动之外,还有另外两个featureruntime-async-std-native-tls:表示选择任意异步运行时macros:启用一些派生宏
再添加一个异步运行时来支持异步编程,这里使用futures
[dependencies]
futures = "0.3.30"
Migration Cli
sea-orm提供了命令行工具sea-orm-cli来运行migration。
首先安装sea-orm-cli工具cargo install sea-orm-cli,然后执行如下命令即可初始化migration项目工程
$ sea-orm-cli migrate init

# The folder structure will be as follows:
.
├── Cargo.toml
├── migration
│   ├── Cargo.toml
│   ├── README.md
│   └── src
│       ├── lib.rs
│       ├── m20220101_000001_create_table.rs
│       └── main.rs
└── src
    └── main.rs
通过执行sea-orm-cli migrate generate bakery来创建migrate文件,生成的文件格式为m<date>_<6-digit-index>_<description>.rs。
编写好migration文件之后,就定义了好了数据库表的生成代码,执行migration文件即可管理数据库表,实现建表和删表的功能。
不过要执行migration文件,需要sea-orm-migration和sea-orm一样启动相同的feature,选择一样的数据库驱动和异步运行时
[dependencies.sea-orm-migration]
version = "0.12.0"
features = [
  "sqlx-postgres",
  "runtime-async-std-native-tls",
]
接着执行下面的命令就可以生成数据库表了
DATABASE_URL="postgres://smarticen:@localhost:5432/example" sea-orm-cli migrate refresh
生成entity文件
通过sea-orm-cli工具,可以为数据库schema中的表生成entity。
# Generate entity files of database `bakeries_db` to `src/entities`
$ sea-orm-cli generate entity \
    -u mysql://root:password@localhost:3306/bakeries_db \
    -o src/entities
使用ActiveModel更新和插入
生成的entity中,使用派生宏又生成了ActiveModel用来进行更新操作。 示例如下
let happy_bakery = bakery::ActiveModel {
	name: ActiveValue::Set("Happy Bakery".to_owned()),
	profit_margin: ActiveValue::Set(0.0),
	..Default::default()
};
let res = Bakery::insert(happy_bakery).exec(db).await?;更改则是同理,构造出一个ActiveModel调用其update方法
et sad_bakery = bakery::ActiveModel {
        id: ActiveValue::Set(res.last_insert_id),
        name: ActiveValue::Set("Sad Bakery".to_owned()),
        profit_margin: ActiveValue::NotSet,
    };
    sad_bakery.update(db).await?;
查询
下面的代码则是查询全部、按主键查询、按条件查询的示例
// Finding all is built-in
let bakeries: Vec<bakery::Model> = Bakery::find().all(db).await?;
assert_eq!(bakeries.len(), 1);

// Finding by id is built-in
let sad_bakery: Option<bakery::Model> = Bakery::find_by_id(1).one(db).await?;
assert_eq!(sad_bakery.unwrap().name, "Sad Bakery");

// Finding by arbitrary column with `filter()`
let sad_bakery: Option<bakery::Model> = Bakery::find()
	.filter(bakery::Column::Name.eq("Sad Bakery"))
	.one(db)
	.await?;
assert_eq!(sad_bakery.unwrap().id, 1);
delete
delete和update以及insert一样都属于更新操作,因此同样通过构造ActiveModel来进行操作
let john = chef::ActiveModel {
	id: ActiveValue::set(1),
	..Default::default()
};
john.delete(db).await?;

let sad_bakery = bakery::ActiveModel {
	id: ActiveValue::Set(1),
	..Default::default()
};
sad_bakery.delete(db).await?;
关联查询
上面的操作都是针对一个entity的操作,但是在关系型数据库当中,entity之间是存在关联关系的,很多时候查询一个entity的时候同样希望将与之关联的entity一并查询出来。
为了举例说明,先准备好下面的数据
async fn init_data() -> Result<(), DbErr> {
    let db = &Database::connect(format!("{}/{}", DATABASE_URL, DB_NAME)).await?;

    let la_boulangerie = bakery::ActiveModel {
        name: ActiveValue::Set("La Boulangeris".to_owned()),
        profit_margin: ActiveValue::Set(0.0),
        ..Default::default()
    };
    let bakery_res = la_boulangerie.insert(db).await?;

    for chef_name in ["Jolie", "Charles", "Madeleine", "Frederic"] {
        let chef = chef::ActiveModel {
            name: ActiveValue::Set(chef_name.to_owned()),
            bakery_id: ActiveValue::Set(bakery_res.id),
            ..Default::default()
        };
        Chef::insert(chef).exec(db).await?;
    }
    Ok(())
}
我们可以先查询一条bakery数据,然后再查询出与bakery关联的数据,例如
async fn query() -> Result<(), DbErr> {
    let db = &Database::connect(format!("{}/{}", DATABASE_URL, DB_NAME)).await?;
    let la_boulangeris = Bakery::find_by_id(2).one(db).await?.unwrap();
    let chefs: Vec<chef::Model> = la_boulangeris.find_related(Chef).all(db).await?;
    let mut chef_names: Vec<String> = chefs.into_iter().map(|b| b.name).collect();
    chef_names.sort_unstable();
    assert_eq!(chef_names, ["Charles", "Frederic", "Jolie", "Madeleine"]);
    Ok(())
}
但是这样当数据量多的时候,需要一条先查询bakery,再查询chef列表效率会非常低。借助loader工具,直接直接在一次查询将需要的bakery和关联的chef全部查出来
async fn query_relate() -> Result<(), DbErr> {
    let db: &sea_orm::DatabaseConnection =
        &Database::connect(format!("{}/{}", DATABASE_URL, DB_NAME)).await?;

    let bakeries = Bakery::find()
        .filter(Condition::any().add(bakery::Column::Id.eq(2)))
        .all(db)
        .await?;

    let chefs = bakeries.load_many(Chef, db).await?;
    let mut la_chef_names: Vec<String> = chefs[0].to_owned().into_iter().map(|b| b.name).collect();
    la_chef_names.sort_unstable();
    assert_eq!(la_chef_names, ["Charles", "Frederic", "Jolie", "Madeleine"]);
    Ok(())
}
Mock接口
主要用于编写测试代码,提供MockDatabase接口,无需操作真实的数据库,以便测试代码不依赖环境。 需要开启mock这个feature
sea-orm = { version = "^0.12.0", features = [ ... , "mock" ] }然后通过MockDatabase这个对象,可以用来构造指定的查询结果和运行结果,保证能够从中获得指定的数据,然后验证一些依赖数据库的代码的正确性。
let db: &DatabaseConnection = &MockDatabase::new(DatabaseBackend::MySql)
            .append_query_results([
                // First query result
                vec![bakery::Model {
                    id: 1,
                    name: "Happy Bakery".to_owned(),
                    profit_margin: 0.0,
                }],
                // Second query result
                vec![
                    bakery::Model {
                        id: 1,
                        name: "Happy Bakery".to_owned(),
                        profit_margin: 0.0,
                    },
                    bakery::Model {
                        id: 2,
                        name: "Sad Bakery".to_owned(),
                        profit_margin: 100.0,
                    },
                    bakery::Model {
                        id: 3,
                        name: "La Boulangerie".to_owned(),
                        profit_margin: 17.89,
                    },
                ],
            ])
            .append_query_results([
                // Third query result
                vec![
                    chef::Model {
                        id: 1,
                        name: "Jolie".to_owned(),
                        contact_details: None,
                        bakery_id: 3,
                    },
                    chef::Model {
                        id: 2,
                        name: "Charles".to_owned(),
                        contact_details: None,
                        bakery_id: 3,
                    },
                    chef::Model {
                        id: 3,
                        name: "Madeleine".to_owned(),
                        contact_details: None,
                        bakery_id: 3,
                    },
                    chef::Model {
                        id: 4,
                        name: "Frederic".to_owned(),
                        contact_details: None,
                        bakery_id: 3,
                    },
                ],
])append_query_results中vec!添加每一个数组都是一次查询返回的结果,并且是按照查询的顺序返回的,比如第一次查询的结果,第二次查询的结果等等。对于一些更新的操作,还可以通过append_exec_results来指定返回的执行结果。
SeaQuery灵活构建SQL
可以将原始的SQL构造成对应的SeaQuery而从实现灵活的sql语句的编写。 例如原始的SQL
INSERT INTO `bakery` (`name`, `profit_margin`) VALUES ('SQL Bakery', -100)可以构造成如下的SeaQuery
async fn sea_query() -> Result<(), DbErr> {
    let db: &sea_orm::DatabaseConnection =
        &Database::connect(format!("{}/{}", DATABASE_URL, DB_NAME)).await?;

    let columns: Vec<Alias> = ["name", "profit_margin"]
        .into_iter()
        .map(Alias::new)
        .collect();

    let mut stmt = Query::insert();
    stmt.into_table(bakery::Entity).columns(columns);

    // Invoke `values_panic()` for each row
    stmt.values_panic(["SQL Bakery".into(), (-100.0).into()]);

    let builder = db.get_database_backend();
    db.execute(builder.build(&stmt)).await?;

    Ok(())
}
一个复杂的查询sql
SELECT `chef`.`name` FROM `chef` JOIN `bakery` ON `chef`.`bakery_id` = `bakery`.`id` ORDER BY `chef`.`name` ASC同样也可以构造成SeaQuery来完成。对于查询来说,默认生成的Model可以用来接收所有的查询字段,但是如果只对数据库表的部分列感兴趣,并且不希望将其他列暴露给上层的查询接口,那么可以通过自定义一个结构体来持有感兴趣的列,需要为这个结构体实现FromQueryResult
#[derive(FromQueryResult)]
struct ChefNameResult { name: String, }

async fn sea_query_select() -> Result<(), DbErr> {
    let db = &Database::connect(format!("{}/{}", DATABASE_URL, DB_NAME)).await?;

    let column = (chef::Entity, Alias::new("name"));
    let mut stmt = Query::select();
    stmt.column(column.clone()) // Use `expr_as` instead of `column` if renaming is necessary
        .from(chef::Entity)
        .join(
            JoinType::Join,
            bakery::Entity,
            Expr::col((chef::Entity, Alias::new("bakery_id")))
                .equals((bakery::Entity, Alias::new("id"))),
        )
        .order_by(column, Order::Asc);

    let builder = db.get_database_backend();
    let chef = ChefNameResult::find_by_statement(builder.build(&stmt))
        .all(db)
        .await?;

    let chef_names = chef.into_iter().map(|b| b.name).collect::<Vec<_>>();

    assert_eq!(
        chef_names,
        vec!["Charles", "Frederic", "Jolie", "Madeleine"]
    );
    Ok(())
}
为了方便校验生成结果的正确性,可以将statement转换为对应数据库的sql语句来校验。
println!({}, stmt.to_string(MysqlQueryBuilder));详细说明
通过上面的介绍我们能够快速上手sea-orm的使用,参考这官方文档基本上能够满足需求了。 这里我们对前面涉及到的内存做进一步的说明
DatabaseConnect
sea-orm建立的数据连接对象是DatabaseConnect,通过如下的代码来完成
let db: DatabaseConnection = Database::connect("protocol://username:password@host/database").await?;DatabaseConnect的底层持有sqlx::Pool,也就是一个数据库连接池,执行sql语句的时候会自动从连接池中取出连接并在执行结束后放入池子当中,池子的大小就是数据库语句并发的大小。
作为一个数据库连接池,那么同样也可以设置池子的一些选项,例如连接数、超时时间的设定等等,通过连接选项来完成
connect option
let mut opt = ConnectOptions::new("protocol://username:password@host/database");
opt.max_connections(100)
    .min_connections(5)
    .connect_timeout(Duration::from_secs(8))
    .acquire_timeout(Duration::from_secs(8))
    .idle_timeout(Duration::from_secs(8))
    .max_lifetime(Duration::from_secs(8))
    .sqlx_logging(true)
    .sqlx_logging_level(log::LevelFilter::Info)
    .set_schema_search_path("my_schema"); // Setting default PostgreSQL schema

let db = Database::connect(opt).await?;
对于数据库连接,提供了ping方法来检测连接的有效性
|db: DatabaseConnection| {
    assert!(db.ping().await.is_ok());
    db.clone().close().await;
    assert!(matches!(db.ping().await, Err(DbErr::ConnectionAcquire)));
}
连接池会在drop的时候自动关闭,当然也可以手动close
let db = Database::connect(url).await?;

// Closing connection here
db.close().await?;
Debug日志
sea-orm通过tracing crate来打印debug日志,需要开启sea-orm的debug-print feature
[dependencies.sea-orm]
version = "0.12"
features = ["debug-print"]产生的debug日志要被消费,需要设置tracing-subscriber,debug日志会自动将sql语句的占位符替换为实际的参数值
pub async fn main() {
    tracing_subscriber::fmt()
        .with_max_level(tracing::Level::DEBUG)
        .with_test_writer()
        .init();

    // ...
}
sqlx日志
默认情况下使用的是sqlx的日志,启动debug-print feature之后,可以通过连接选项来关闭sqlx日志
let mut opt = ConnectOptions::new("protocol://username:password@host/database".to_owned());
opt
    .sqlx_logging(false) // Disable SQLx log
    .sqlx_logging_level(log::LevelFilter::Info); // Or set SQLx log level

let db = Database::connect(opt).await?;
migration
现在我们知道migration是用来创建数据库表结构的,可以在程序首次运行之前初始化数据库。 借助sea-orm提供的命令行工具sea-orm-cli来完成。
migration目录结构
这里介绍一下推荐的migration工程的搭建。
- 初始化migration目录,在当前路径下创建一个migration目录并初始化
sea-orm-cli migrate init- 在当前工程创建entity crate,并添加sea-orm依赖
[dependencies]
sea-orm = { version = "0.12" }- 应用工程引入这两个crate
[workspace]
members = [".", "entity", "migration"]

[dependencies]
entity = { path = "entity" }
migration = { path = "migration" } # depends on your needs

[dependencies]
sea-orm = { version = "0.12", features = [..] }
migration的编写
migration编写的就是创建数据库表结构的DDL语句。
- 创建一个migration
sea-orm-cli migrate generate create_table- 在生成的代码中填充未完成的部分,up即创建表的部分,down未删除表的部分
use sea_orm_migration::prelude::*;

#[derive(DeriveMigrationName)]
pub struct Migration;

#[async_trait]
impl MigrationTrait for Migration {
    async fn up(&self, manager: &SchemaManager) -> Result<(), DbErr> {
        manager
            .create_table( ... )
            .await
    }

    async fn down(&self, manager: &SchemaManager) -> Result<(), DbErr> {
        manager
            .drop_table( ... )
            .await
    }
}- 通过cli命令生成的migration会自动按照时间顺序添加到Migrator当中
pub use sea_orm_migration::*;

mod m20220101_000001_create_table;

pub struct Migrator;

#[async_trait]
impl MigratorTrait for Migrator {
    fn migrations() -> Vec<Box<dyn MigrationTrait>> {
        vec![
            Box::new(m20220101_000001_create_table::Migration),
        ]
    }
}
在具体的migration的编写当中,可以使用seaQuery和raw sql两种方式。raw sql方式就不加说明了,就是写原始sql。这里主要介绍一下seaQuery的方式。
首先通过DeriveIdent来定义标识符,其中Table是比较特殊的点,会被映射为枚举的名,可以看作是数据库表名,其他的部分就看作是表的字段名,还可以通过下面代码中示例的宏一样来修改映射的字段名。
#[derive(DeriveIden)]
enum Post {
	Table, // this is a special case; will be mapped to `post`
	Id,
	Title,
	#[sea_orm(iden = "full_text")] // Renaming the identifier
	Text,
}

assert_eq!(Post::Table.to_string(), "post");
assert_eq!(Post::Id.to_string(), "id");
assert_eq!(Post::Title.to_string(), "title");
assert_eq!(Post::Text.to_string(), "full_text");
在migration的up或down方法中,就借助这些表示信息来完成表结构的定义。
migration运行
通过sea-orm-cli可以运行migration,实际上就是运行
cargo run --manifest-path ./migration/Cargo.toml -- COMMAND将COMMAND换成sea-orm-cli对应的命令即可。当然还可以通过程序来运行,可以看到和cli工具的命令参数、选项是一致的
use migration::{Migrator, MigratorTrait};

/// Apply all pending migrations
Migrator::up(db, None).await?;

/// Apply 10 pending migrations
Migrator::up(db, Some(10)).await?;

/// Rollback all applied migrations
Migrator::down(db, None).await?;

/// Rollback last 10 applied migrations
Migrator::down(db, Some(10)).await?;

/// Check the status of all migrations
Migrator::status(db).await?;

/// Drop all tables from the database, then reapply all migrations
Migrator::fresh(db).await?;

/// Rollback all applied migrations, then reapply all migrations
Migrator::refresh(db).await?;

/// Rollback all applied migrations
Migrator::reset(db).await?;
生成数据
migration定义了表结构,但是如果表中可以预定义一些数据,那么在migration当中也是可以做的。
use sea_orm_migration::sea_orm::{entity::*, query::*};

// ...

#[async_trait]
impl MigrationTrait for Migration {
    async fn up(&self, manager: &SchemaManager) -> Result<(), DbErr> {
        let db = manager.get_connection();

        cake::ActiveModel {
            name: Set("Cheesecake".to_owned()),
            ..Default::default()
        }
        .insert(db)
        .await?;

        Ok(())
    }
}
还有最开始介绍的seaquery,这些数据操作的方式在这里也是同样可以使用的。数据的初始化还可以开启事务
use sea_orm_migration::sea_orm::{entity::*, query::*};

// ...

#[async_trait]
impl MigrationTrait for Migration {
    async fn up(&self, manager: &SchemaManager) -> Result<(), DbErr> {
        // Get the connection and start a transaction
        let db = manager.get_connection();
        let transaction = db.begin().await?;

        // Insert with the transaction connection
        cake::ActiveModel {
            name: Set("Cheesecake".to_owned()),
            ..Default::default()
        }
        .insert(&transaction)
        .await?;

        // Commit it
        transaction.commit().await?;

        Ok(())
    }
}
entity生成
migration往数据库中建表,entity则是基于数据库表生成代码级别的对应对象,方便代码对其进行操作,通过sea-orm-cli工具完成
配置环境变量
在环境变量或者项目根目录下的.env文件,指定数据库连接的url
DATABASE_URL=protocol://username:password@localhost/databaseentity生成
生成entity文件使用命令sea-orm-cli generate entity例如
sea-orm-cli generate entity -u protocol://username:password@localhost/bakery -o entity/src这里通过-u手动置顶数据库连接,-o指定entity文件生成的位置。
生成命令还有需要额外的选项,可以用来控制生成的entity的属性,比如为其添加派生宏增加实现。可以通过sea-orm-cli generate entity -h来查询具体的说明。
Model结构
一个生成的entity结构如下
use sea_orm::entity::prelude::*;

#[derive(Clone, Debug, PartialEq, Eq, DeriveEntityModel)]
#[sea_orm(table_name = "cake")]
pub struct Model {
    #[sea_orm(primary_key)]
    pub id: i32,
    pub name: String,
}

#[derive(Copy, Clone, Debug, EnumIter, DeriveRelation)]
pub enum Relation {
    #[sea_orm(has_many = "super::fruit::Entity")]
    Fruit,
}

impl Related<super::fruit::Entity> for Entity {
    fn to() -> RelationDef {
        Relation::Fruit.def()
    }
}

impl ActiveModelBehavior for ActiveModel {}其中核心是DeriveEntityModel这个宏,它负责完成了定义Entity相关的Model、Column、PrimaryKey等繁重的工作。
#[sea_orm(table_name = "cake")]则是指定了数据库表名。还有schema_name属性可以指定数据库schema名或者数据库名。
Column结构
所有的列名都假定是蛇形命名的,当然也可以通过对应的属性来进行覆盖,例如#[sea_orm(column_name = "name")]
至于类型的映射可以查询文档Column Type,列出了rust类型,sea-orm定义的ColumnType以及对应的数据库实现的类型的映射关系。
作为开发者主要关注rust类型和sea-orm定义的列类型之间的映射即可。上面的链接当中的也是默认的映射关系,如果需要修改默认的映射关系也是可以的,通过设置属性#[sea_orm(column_type = "Text")]
如果对于数据库中为json类型的字段,在rust代码中希望可以通过结构体来接收,需要接受的结构体derive FromJsonQueryResult,如下
#[derive(Clone, Debug, PartialEq, Eq, DeriveEntityModel)]
#[sea_orm(table_name = "json_struct")]
pub struct Model {
    #[sea_orm(primary_key)]
    pub id: i32,
    // JSON column defined in `serde_json::Value`
    pub json: Json,
    // JSON column defined in custom struct
    pub json_value: KeyValue,
    pub json_value_opt: Option<KeyValue>,
}

// The custom struct must derive `FromJsonQueryResult`, `Serialize` and `Deserialize`
#[derive(Clone, Debug, PartialEq, Eq, Serialize, Deserialize, FromJsonQueryResult)]
pub struct KeyValue {
    pub id: i32,
    pub name: String,
    pub price: f32,
    pub notes: Option<String>,
}
column额外属性
对于列还可以添加唯一、索引、nullable等属性。
#[sea_orm(column_type = "Text", default_value = "Sam", unique, indexed, nullable)]
pub name: Option<String>
属性这里比较多,这里简单介绍一下
- 类型转换:
#[sea_orm(select_as = "text", save_as = "citext")]查询的时候当作text类型处理,保存的时候作为citext类型处理。 - 忽略:
#[sea_orm(ignore)]不与数据库列进行映射 - 主键:将列标记为主键
#[sea_orm(primary_key)] - 自增:
#[sea_orm(primary_key, auto_increment = false)],对于主键来说,默认为true,可以手动指定为false - 联合主键:就是将主键属性加到多个列上面,对于联合主键来说,自增属性是false
Relation结构
Relation用于关联不同的entity,与model类型,绝大部分工作通过派生宏DeriveRelation完成了。
#[derive(Copy, Clone, Debug, EnumIter, DeriveRelation)]
pub enum Relation {
#[sea_orm(has_many = "super::fruit::Entity")]
Fruit,
}
ActiveModel
ActiveModel用于更新entity,在其中可以定义钩子函数,在插入,删除等操作之前或者之后执行一些额外的处理。
#[async_trait]
impl ActiveModelBehavior for ActiveModel {
    /// Create a new ActiveModel with default values. Also used by `Default::default()`.
    fn new() -> Self {
        Self {
            uuid: Set(Uuid::new_v4()),
            ..ActiveModelTrait::default()
        }
    }

    /// Will be triggered before insert / update
    async fn before_save<C>(self, db: &C, insert: bool) -> Result<Self, DbErr>
    where
        C: ConnectionTrait,
    {
        if self.price.as_ref() <= &0.0 {
            Err(DbErr::Custom(format!(
                "[before_save] Invalid Price, insert: {}",
                insert
            )))
        } else {
            Ok(self)
        }
    }

    /// Will be triggered after insert / update
    async fn after_save<C>(model: Model, db: &C, insert: bool) -> Result<Model, DbErr>
    where
        C: ConnectionTrait,
    {
        Ok(model)
    }

    /// Will be triggered before delete
    async fn before_delete<C>(self, db: &C) -> Result<Self, DbErr>
    where
        C: ConnectionTrait,
    {
        Ok(self)
    }

    /// Will be triggered after delete
    async fn after_delete<C>(self, db: &C) -> Result<Self, DbErr>
    where
        C: ConnectionTrait,
    {
        Ok(self)
    }
}
枚举值
期望让枚举当中的值作为数据库当中字段的取值范围。 例如,定义一个字符串的枚举值作为字段的取值范围。
#[derive(EnumIter, DeriveActiveEnum)]
#[sea_orm(rs_type = "String", db_type = "String(Some(1))")]
pub enum Category {
	#[sea_orm(string_value = "B")]
	Big,
	#[sea_orm(string_value = "S")]
	Small,
}
同理,还是数值型的枚举
#[derive(EnumIter, DeriveActiveEnum)]
#[sea_orm(rs_type = "i32", db_type = "Integer")]
pub enum Color {
    #[sea_orm(num_value = 0)]
    Black,
    #[sea_orm(num_value = 1)]
    White,
}
实践
从概念上一点点介绍比较麻烦,代码和宏的方式也显得比较冗余。直接以实践为切入点来学习宏的使用。 按照数据库生成entity的方式可能满足不了需求,还是需要手动编码。
Relation
entity前面介绍的已经够多了,复杂的地方在于关联关系上。 关联关系是两个entity之间的关系,为了方便后续的介绍,在M:N关系中,称M为左端,N为右端。
One to One
左端
一个Relation的写法如下,关联关系需要使用派生宏DeriveRelation,并且关联的对象使用属性宏sea_orm进行添加额外的属性
#[derive(Copy, Clone, Debug, EnumIter, DeriveRelation)]
pub enum Relation {
	#[sea_orm(has_one = "super::fruit::Entity")]
	Fruit,
}

// `Related` trait has to be implemented by hand
impl Related<super::fruit::Entity> for Entity {
	fn to() -> RelationDef {
		Relation::Fruit.def()
	}
}- has_one:限制了1:1的关系
右端
#[derive(Copy, Clone, Debug, EnumIter, DeriveRelation)]
pub enum Relation {
    #[sea_orm(
        belongs_to = "super::cake::Entity",
        from = "Column::CakeId",
        to = "super::cake::Column::Id"
    )]
    Cake,
}

// `Related` trait has to be implemented by hand
impl Related<super::cake::Entity> for Entity {
    fn to() -> RelationDef {
        Relation::Cake.def()
    }
}- belongs_to:左端的entity
- from:右端关联关系使用的列
- to:左端关联关系使用的列
One to Many
和1:1非常相似,只需要在左端,将属性宏中的has_one属性变更为has_many即可,右端是一样的。
#[derive(Copy, Clone, Debug, EnumIter, DeriveRelation)]
pub enum Relation {
	#[sea_orm(has_many = "super::fruit::Entity")]
	Fruit,
}

// `Related` trait has to be implemented by hand
impl Related<super::fruit::Entity> for Entity {
	fn to() -> RelationDef {
		Relation::Fruit.def()
	}
}
Many to Many
M:N关联通过需要一个中间表来专门记录关联关系。 比如cake和filling两个entity之间是M:N的关系,那么需要通过cake_filling来专门记录关系。
- cake_filling:中间表,相对于两个entity来说,都是右端
#[derive(Copy, Clone, Debug, EnumIter, DeriveRelation)]
pub enum Relation {
	#[sea_orm(
		belongs_to = "super::cake::Entity",
		from = "Column::CakeId",
		to = "super::cake::Column::Id"
	)]
	Cake,
	#[sea_orm(
		belongs_to = "super::filling::Entity",
		from = "Column::FillingId",
		to = "super::filling::Column::Id"
	)]
	Filling,
}- cake:通过cake找到对应filling,需要通过中间表cake_filling,关键在于
Relatedtrait的via方法。可以看到需要通过cake_filling反向再到filling
impl Related<super::filling::Entity> for Entity {
    fn to() -> RelationDef {
        super::cake_filling::Relation::Filling.def()
    }

    fn via() -> Option<RelationDef> {
        Some(super::cake_filling::Relation::Cake.def().rev())
    }
}- filling同理
impl Related<super::cake::Entity> for Entity {
    fn to() -> RelationDef {
        super::cake_filling::Relation::Cake.def()
    }

    fn via() -> Option<RelationDef> {
        Some(super::cake_filling::Relation::Filling.def().rev())
    }
}
链式Relations
在一次查询中涉及到多次跨表join,通过Linked trait来完成。
就比如上面的cake, cake_filling, filling的示例,这里通过Linked trait来完成就是
pub struct CakeToFilling;

impl Linked for CakeToFilling {
    type FromEntity = cake::Entity;

    type ToEntity = filling::Entity;

    fn link(&self) -> Vec<RelationDef> {
        vec![
            cake_filling::Relation::Cake.def().rev(),
            cake_filling::Relation::Filling.def(),
        ]
    }
}
借助Linked可以进行管理查询,分为lazy load和eager load,就是指查询结果包不包含自身
- lazy load:可以看到查询的sql当中指查询了filling的列,不包含cake
let cake_model = cake::Model {
    id: 12,
    name: "".to_owned(),
};

assert_eq!(
    cake_model
        .find_linked(cake::CakeToFilling)
        .build(DbBackend::MySql)
        .to_string(),
    [
        "SELECT `filling`.`id`, `filling`.`name`, `filling`.`vendor_id`",
        "FROM `filling`",
        "INNER JOIN `cake_filling` AS `r0` ON `r0`.`filling_id` = `filling`.`id`",
        "INNER JOIN `cake` AS `r1` ON `r1`.`id` = `r0`.`cake_id`",
        "WHERE `r1`.`id` = 12",
    ]
    .join(" ")
);- eager load:包含cake和fruit
assert_eq!(
    cake::Entity::find()
        .find_also_linked(links::CakeToFilling)
        .build(DbBackend::MySql)
        .to_string(),
    [
        r#"SELECT `cake`.`id` AS `A_id`, `cake`.`name` AS `A_name`,"#,
        r#"`r1`.`id` AS `B_id`, `r1`.`name` AS `B_name`, `r1`.`vendor_id` AS `B_vendor_id`"#,
        r#"FROM `cake`"#,
        r#"LEFT JOIN `cake_filling` AS `r0` ON `cake`.`id` = `r0`.`cake_id`"#,
        r#"LEFT JOIN `filling` AS `r1` ON `r0`.`filling_id` = `r1`.`id`"#,
    ]
    .join(" ")
);
自定义join条件
#[derive(Copy, Clone, Debug, EnumIter, DeriveRelation)]
pub enum Relation {
    #[sea_orm(has_many = "super::fruit::Entity")]
    Fruit,
    #[sea_orm(
        has_many = "super::fruit::Entity",
        // Additional on_condition, accept anything that implements `sea_query::IntoCondition`
        on_condition = r#"super::fruit::Column::Name.like("%tropical%")"#
    )]
    TropicalFruit,
    #[sea_orm(
        has_many = "super::fruit::Entity",
        on_condition = r#"super::fruit::Column::Name.like("%tropical%")"#
        condition_type = "any",
    )]
    OrTropicalFruit,
}- on_condition定义了表达式
- condition_type为any表示条件为or
loader
loader用于批量查询关联的entity
let cake_with_fruits: Vec<(cake::Model, Vec<fruit::Model>)> = Cake::find()
    .find_with_related(Fruit)
    .all(db)
    .await?;
等价于
SELECT
    "cake"."id" AS "A_id",
    "cake"."name" AS "A_name",
    "fruit"."id" AS "B_id",
    "fruit"."name" AS "B_name",
    "fruit"."cake_id" AS "B_cake_id"
FROM "cake"
LEFT JOIN "fruit" ON "cake"."id" = "fruit"."cake_id"
ORDER BY "cake"."id" ASC
还有其他的关联查询,例如
let cakes: Vec<cake::Model> = Cake::find().all(db).await?;
let fruits: Vec<Vec<fruit::Model>> = cakes.load_many(Fruit, db).await?;
let fillings: Vec<Vec<filling::Model>> = cakes.load_many_to_many(Filling, CakeFilling, db).await?;